2022. 5. 27. 16:59ㆍWeb/Spring
프로젝트를 하다보니 팀원 간의 코드를 확인할 일이 있었는데 헷갈린 부분이 있어서 적는다.
Spring의 기본적인 특징 중 DI인데, Dependency Injection 곧 의존 관계 주입으로 어떤 객체를 사용할 때 의존 객체를 직접 만들어서 사용하는 것이 아니라, 주입 받아서 사용하는 방법이다.
이렇게 DI 곧 의존성을 주입하여 사용하는 이유는 한 객체 간의 결합도를 낮추기 위함이다.
객체 간의 결합도가 높으면 한 객체를 수정할 때 연관된 다른 객체를 수정할 부분이 많아지기 때문이다.
가령 책이라는 클래스로 예를 들어보겠다.
package practice;

class Item {
    private Book book;
    public Item() {
        this.book = new Book();
    }
    public void getItemName() {
        this.book.getName();
    }
}

class Book {
    String name;
    public Book() {
        this.name = "The Little Prince";
    }

    public void getName() {
        System.out.println(name);
    }
}

public class SampleClass {
    public static void main(String[] args) {
        Item item = new Item();
        item.getItemName();
    }
}
가령 Book이라는 클래스가 있고 상위 클래스로 Item을 두고 Item의 새로운 객체를 생성한다.
Item 에서 getItemName() 메소드를 사용하기 위해서는 Book 객체를 이용해야만 한다.
-> 즉 Item 클래스는 Book 클래스의 의존성을 가진다고 말할 수 있다.
만약 Book에서 getName() 메소드를 수정해야 한다면 그에 맞춰서 Item에 있는 getItemName() 메소드도 수정되어야 한다.
이렇게 결합도가 높다면 각 클래스는 유연성이 낮다고 말할 수 있다.
이러한 문제를 해결하기 위해 스프링에서는 위에서 언급한대로 의존성 주입을 활용하여 추상화된 객체를 외부에서 주입 받아 해결하고 있다.
이를 잘 이해하기 위해서는 Spring이 어떠한 원리로 활용되고 있는지 필수적으로 알아야 한다.
이전에는 Spring의 기본적인 원리를 잘 몰랐던 거 같다. 이번 기회에 하나씩 찬찬히 살펴보면서 Spring의 IoC 컨테이너와 어떻게 객체를 만들고 어떻게 관리가 되는지 살펴보려고 한다.
Spring doc 에서 해석해보고 하나씩 차근차근 요약해보려고 한다.
스프링에서는 IoC 컨테이너를 활용하여 객체를 저장하는데 저장하는 자바 객체를 Bean이라고 부른다. (Spring IoC container are called beans.)
1.3 Bean Definition을 보면 이렇게 말한다. : A Spring IoC container manages one or more beans.
1.4. 에서는 지금 알아보려고 하는 의존성에 대해 나오는데 인용을 하면 다음과 같다.
Dependency injection (DI) is a process whereby objects define their dependencies (that is, the other objects with which they work) only through constructor arguments, arguments to a factory method, or properties that are set on the object instance after it is constructed or returned from a factory method. The container then injects those dependencies when it creates the bean. This process is fundamentally the inverse (hence the name, Inversion of Control) of the bean itself controlling the instantiation or location of its dependencies on its own by using direct construction of classes or the Service Locator pattern.
Code is cleaner with the DI principle, and decoupling is more effective when objects are provided with their dependencies. The object does not look up its dependencies and does not know the location or class of the dependencies. As a result, your classes become easier to test, particularly when the dependencies are on interfaces or abstract base classes, which allow for stub or mock implementations to be used in unit tests.
DI exists in two major variants: Constructor-based dependency injection and Setter-based dependency injection.
해석을 하면 이렇게 말하고 있다. DI는 객체가 그들의 의존성을 생성자 argument나 factory 메소드나 혹은 객체 인스턴스에서 세워진 프로퍼티를 통해서"만" 정의하는 과정이라고 한다.
factory 메소드 어쩌고.. 이런게 처음에는 무슨 말인지 모를 수도 있으나 Spring이 객체를 생성하고 저장하고 사용하는지 코드 하나하나를 일일히 확인해보면 이해할 수 있다.
https://docs.spring.io/spring-framework/docs/current/reference/html/core.html#beans
1.1 IoC 컨테이너에 대한 서명을 잘 읽어보면 이를 알 수 있다.
Spring의 IoC 컨테이너의 기본은 org.springframework.beans와 org.springframework.context 패키지라고 한다. beans에 있는 beanFactory는 객체를 관리하는데 필요한 인터페이스를 제공한다. beanFactory의 서브 인터페이스인 ApplicationContext는 Spring AOP의 특징을 더 쉽게 통합할 수 있도록 하고 메시지 자원 핸들링(이건 무슨 뜻인지 잘 모르겠음...)과 WebApplcationContext의 사용에서 애플리케이션 계층의 특정한 context를 제공한다.
[요약]IoC 컨테이너는 기본적으로 BeanFactory와 ApplicationContext를 통해 관리.BeanFactory는 Spring Framework의 기본적인 구성과 설정을 제공.ApplicationContext는 Spring IoC 컨테이너를 설명하는데에 배타적(exclusively)으로 사용.
IoC 컨테이너컨테이너는 객체들을 수집하고 관리하는데 이는 XML을 통해 그 구성을 활용할 수 있다고 한다. 전통적으로는 XML을 통해 데이터를 설정했지만 이제는 @(어노테이션)을 통해 그 형식을 사용할 수 있다고 한다.
<?xml version="1.0" encoding="UTF-8"?>
<beans xmlns="http://www.springframework.org/schema/beans"
    xmlns:xsi="http://www.w3.org/2001/XMLSchema-instance"
    xmlns:context="http://www.springframework.org/schema/context"
    xsi:schemaLocation="http://www.springframework.org/schema/beans
        https://www.springframework.org/schema/beans/spring-beans.xsd
        http://www.springframework.org/schema/context
        https://www.springframework.org/schema/context/spring-context.xsd">

    <context:annotation-config/>
	<!-- 다른 xml 파일 import를 이렇게 활용할 수 있음.-->
    <import resource="service.xml"/>
    <import resource="...xml"/>

    <bean id="" class="">
    	<!--Collaborators and configuration for this bean go here -->
    </bean>
    <bean id="" class="">
    	<!--Collaborators and configuration for this bean go here -->
    </bean>
    <bean id="" class="">
    	<!--Collaborators and configuration for this bean go here -->
    </bean>
</beans>
XML을 활용한 형식은 다음과 같은데 이제는 XML을 일일히 설정하지 않아도 @Configuration, @Bean, @Import와 같은 어노테이션을 통해 이를 사용할 수 있다.
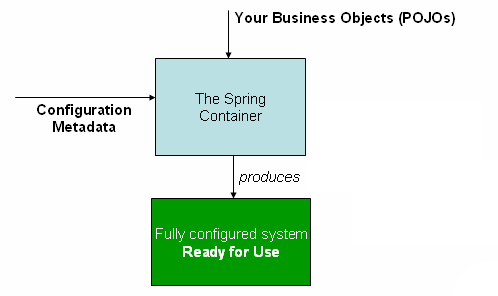
위 다이어그램은 어떻게 Spring이 작동하는지를 보여주는데, 비즈니스 객체를 넣으면 Spring Container는 metadata를 환경 설정해주고, 이를 통해 시스템을 사용할 수 있다고 한다.
이렇게 XML 파일로 설정된 Bean 객체는 ApplicationContext를 통해 컨테이너에서 관리된다.
ApplicationContext에 대한 자바 코드는 아래와 같다.
// create and configure beans
ApplicationContext context = new ClassPathXmlApplicationContext("services.xml", "daos.xml");

// retrieve configured instance
PetStoreService service = context.getBean("petStore", PetStoreService.class);

// use configured instance
List<String> userList = service.getUsernameList();
ApplicationContext를 통해 XML 파일로 정의되어 있는 Bean을 읽고
getBean()을 통해 bean 인스턴스를 검색하고 아래 userList에서는 service에 정의되어 있는 메소드를 사용할 수 있다.
'Web > Spring' 카테고리의 다른 글
| [JPA] QueryDSL 사용하기 - 환경설정 (1) (0) | 2022.06.20 |
|---|---|
| [Spring] 생성자 주입 vs 필드 주입 - Spring 특성 (2) (0) | 2022.05.29 |
| [JPA] 장바구니 상품 담기 - Hibernate 영속성 Cascade (0) | 2022.05.20 |
| [JPA] Hibernate 오류 : failed to lazily initialize a collection of role (0) | 2022.05.17 |
| [JPA] 댓글 수정하기 기능 - @RequestBody, @ModelAttribute (2) (0) | 2022.04.22 |