2022. 8. 14. 21:12ㆍWeb/Spring
지난 편과 이어진다.
https://begintoend.tistory.com/85
[Spring] Spring Security - OAuth2 사용해보기 (1)
Spring Security 설정에 더해 Oauth를 이용하여 구글, 네이버, 카카오 계정 로그인 설정을 하려고 한다. 일단 google 계정을 생성하기 위해 https://console.cloud.google.com/ 에 접속한다. 이미 만들어져 있어서..
begintoend.tistory.com
OAuth를 통해 소셜 로그인 기능을 사용해보자고 논의를 한 후, OAuth 기능을 추가하다가 전체 오류가 발생해서(^^;;) 브랜치를 아예 새로 팠다... (팀원들에게는 미안함 ㅠ) 그렇게 하고 손을 놓고 있다가 정말 해야할 때가 와서 추가 하였다.
우선 OAuth에 대한 설명을 한 번 더 읽어보는 계기가 되었다.
https://www.baeldung.com/spring-security-5-oauth2-login
Spring Security 5 - OAuth2 Login | Baeldung
Learn how to authenticate users with Facebook, Google or other credentials using OAuth2 in Spring Security 5.
www.baeldung.com
여기서 제시한 5.1 로그인 페이지 부분부터 configure를 시작하였다.
이미 formLogin에 대한 AuthenticationProvider, Intercepter, UserDetails에 대한 custom 클래스를 생성해 놓은 상태에서 예제 그대로 하기에는 오류 사항도 많았다.
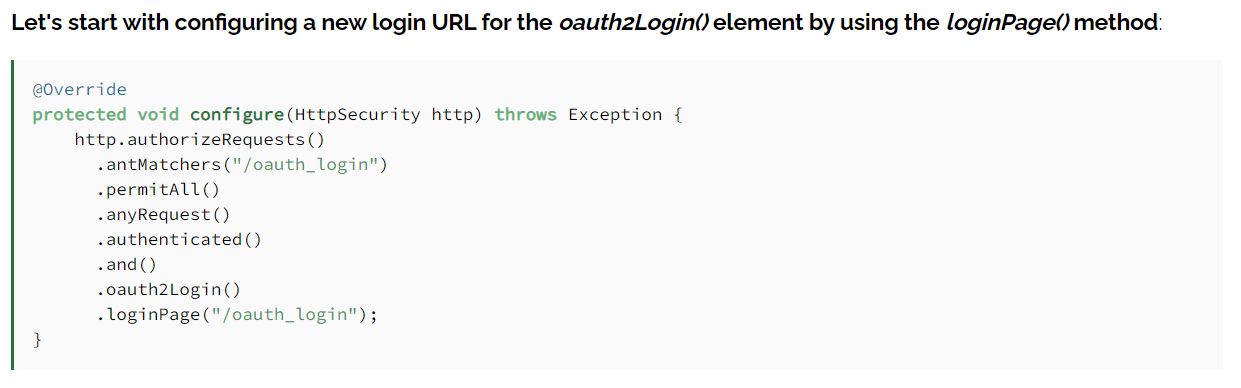
일단 여기에서 읽어보면 .oauthLogin() 메소드는 소셜 로그인에 대한 기능을 제공하고 .loginPage()는 oauth 로그인을 어떻게 하는지에 관해 나오는 거 같았다.
그래서 일단 configure에서 formLogin에 대한 메소드가 정의된 부분에 이어
.and()로 oauthLogin()을 활성화해놨다.
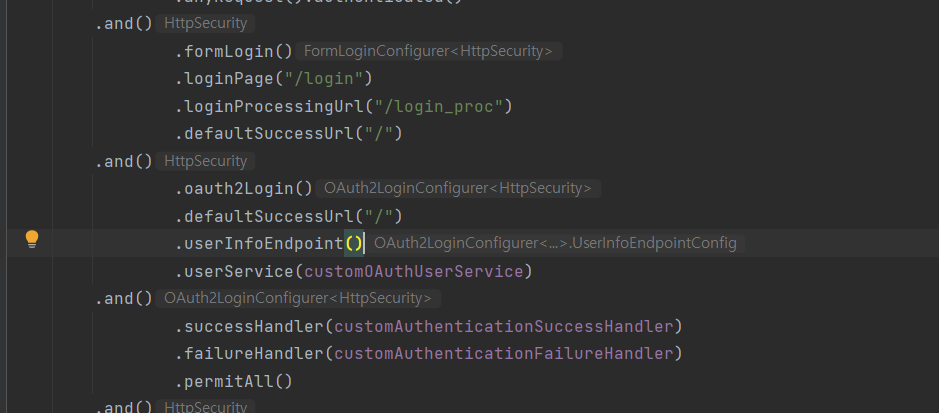
userInfoEndPoint는 OAuth 에서 인증된 유저에 대한 보호 자원이라고 한다. 유저가 인증을 요청한다면 클라이언트는 UserInfoEndPoint를 통해 OpenID Connect Authentication에서 얻은 Access Token을 사용할 수 있도록 한다. (https://openid.net/specs/openid-connect-core-1_0.html#UserInfo)
이를 이해하기 위해서는 OAuth가 인증하는 방법에 대한 지식이 있어야 하는데 간단하게 사진으로 보자면 아래와 같다.
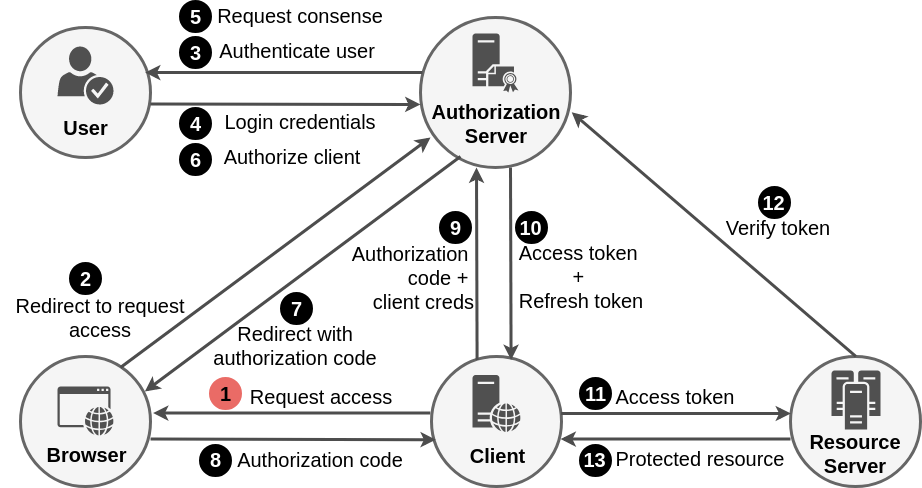
이는 후에 포스팅으로 정리해야겠다.
그렇게 하고 userService는 OAuth 로그인 기능에서 사용되는 DefaultOAuth2UserService를 커스텀해서 사용할 수 있다.
이에 대한 클래스를 CustomOAuthUserService 라고 칭하였다.
DefaultOAuth2UserService를 extends 하면 다음과 같은 메소드가 나온다.
public class CustomOAuthUserService extends DefaultOAuth2UserService {
    @Override
    @Transactional
    public OAuth2User loadUser(OAuth2UserRequest userRequest) throws OAuth2AuthenticationException {
    	return null;
    }
}
궁금해서 OAuth2User 인터페이스에 들어가봤다.
@FunctionalInterface
public interface OAuth2UserService<R extends OAuth2UserRequest, U extends OAuth2User> {

   /**
    * Returns an {@link OAuth2User} after obtaining the user attributes of the End-User
    * from the UserInfo Endpoint.
    * @param userRequest the user request
    * @return an {@link OAuth2User}
    * @throws OAuth2AuthenticationException if an error occurs while attempting to obtain
    * the user attributes from the UserInfo Endpoint
    */
   U loadUser(R userRequest) throws OAuth2AuthenticationException;

}
OAuth2UserRequest와 OAuth2User를 extends 한 인터페이스였는데 OAuth2UserRequest를 들어가보니 다음과 같이 나와있었다.
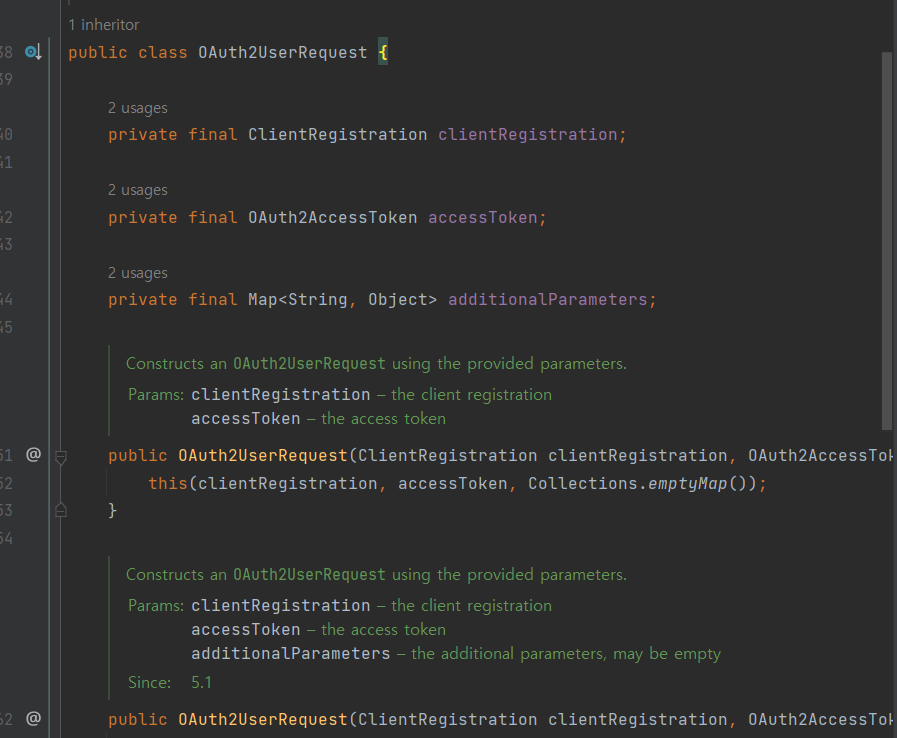
ClientRegistration과 AccessToken, additionalParameters 이렇게 3개의 필드가 있었다.
- ClientRegistration : 로그인을 진행할 서비스 코드를 담는다. (ex 구글, 네이버, 카카오, GitHub 등..)
- accessToken : Resource Server 에 요청을 할 때 OAuth 클라이언트가 사용하는 String이다.
- additionalParameters : 추가적인 Parameter가 넘어온다. (아마 empty라 한다.)
OAuthUser는 OAuth2AuthenticatedPrincipal(extends AuthenticatedPrincipal)을 extends 한 것인데 attributes에 대한 값을 담고 있다. attributes에는 유저에 대한 정보(유저 이름, 아이디, 이미지 등..)가 담겨 있다.
OAuthUser에서 getAttributes()를 통해 attributes를 가져오면 인증된 유저에 대한 정보를 가져올 수 있다.
이를 구현한 코드는 다음과 같다.
OAuthAttributes attributes = OAuthAttributes.of(registrationId, userNameAttributeName, oAuth2User.getAttributes());
Member member = saveOAuth(attributes);
이렇게 가져온 코드로 유저를 새로 생성하였다.
유저를 새로 생성한 후 저장하며, 권한과 정보를 담은 새로운 DefaultOAuth2User에 attribute와 attributeKey를 반환해주었다.
참고했던 책에서는 Role을 enum으로 만들어서 관리했던데 지금 진행 중인 프로젝트는 권한 테이블을 따로 만들어 이를 연결해주는 방식이어서 알맞게 변형할 필요가 있었다.
프로젝트를 새로 시작할 때 관리자, 소비자, 판매자를 role에 따라 기본 역할을 생성하여 role 테이블에는 권한과 이름이 들어가있었다. 기본적으로 oauth로 로그인한 유저는 소비자로 분류하였기에 메소드는 다음과 같이 작성하였다.
여기서 추가적으로 attributes 정보를 넣어주는 Dto인 OAuthAttributes 클래스를 생성하였다.
package com.house.start.domain.dto.Member;

import lombok.Builder;
import lombok.Getter;

import java.util.Map;

@Getter
public class OAuthAttributes {
    private Map<String, Object> attributes;
    private String nameAttributeKey;
    private String name;
    private String email;
    private String picture;

    @Builder
    public OAuthAttributes(Map<String, Object> attributes, String nameAttributeKey,
                           String name, String email,String picture) {
        this.attributes = attributes;
        this.nameAttributeKey = nameAttributeKey;
        this.name = name;
        this.email = email;
        this.picture = picture;
    }

    public static OAuthAttributes of(String registrationId, String userNameAttributes, Map<String, Object> attributes) {
        return ofGoogle(userNameAttributes, attributes);
    }

    private static OAuthAttributes ofGoogle(String userNameAttributeName, Map<String, Object> attributes) {
        return OAuthAttributes.builder()
                .name((String)attributes.get("name"))
                .email((String)attributes.get("email"))
                .picture((String)attributes.get("picture"))
                .attributes(attributes)
                .nameAttributeKey(userNameAttributeName)
                .build();
    }

}
기본 예제 코드를 그대로 갖다쓰긴 했는데 이미 userInfo에 대해서 google, kakao, naver에 대해 설정해 놓은게 있으므로 추가 리팩토링 할 때 반영하고자 한다.
@Transactional
    public Member saveOAuth(OAuthAttributes oAuthAttributes) {
        String name = oAuthAttributes.getName();
        String email = oAuthAttributes.getEmail();

        Set<Role> userRoles = new HashSet<>();
        Role role = roleRepository.findByRoleName("ROLE_CONSUMER");
        userRoles.add(role);

        Member member = Member.builder()
                .name(name)
                .username(email)
                .userRoles(userRoles)
                .build();

        return memberRepository.save(member);
    }
loadByUser에도 @Transactional 어노테이션을 붙여주었다.
다른 예제를 보니 update 기능이 있었다. 만약 기존에 이름과 저장되어 있는 이미지가 기존 db에 저장되어 있는 것과 다르다면 새로 update를 하는 것이다.
후에 추가적으로 구현하기로 하고 일단 insert가 되는지 확인해보기로 한다.
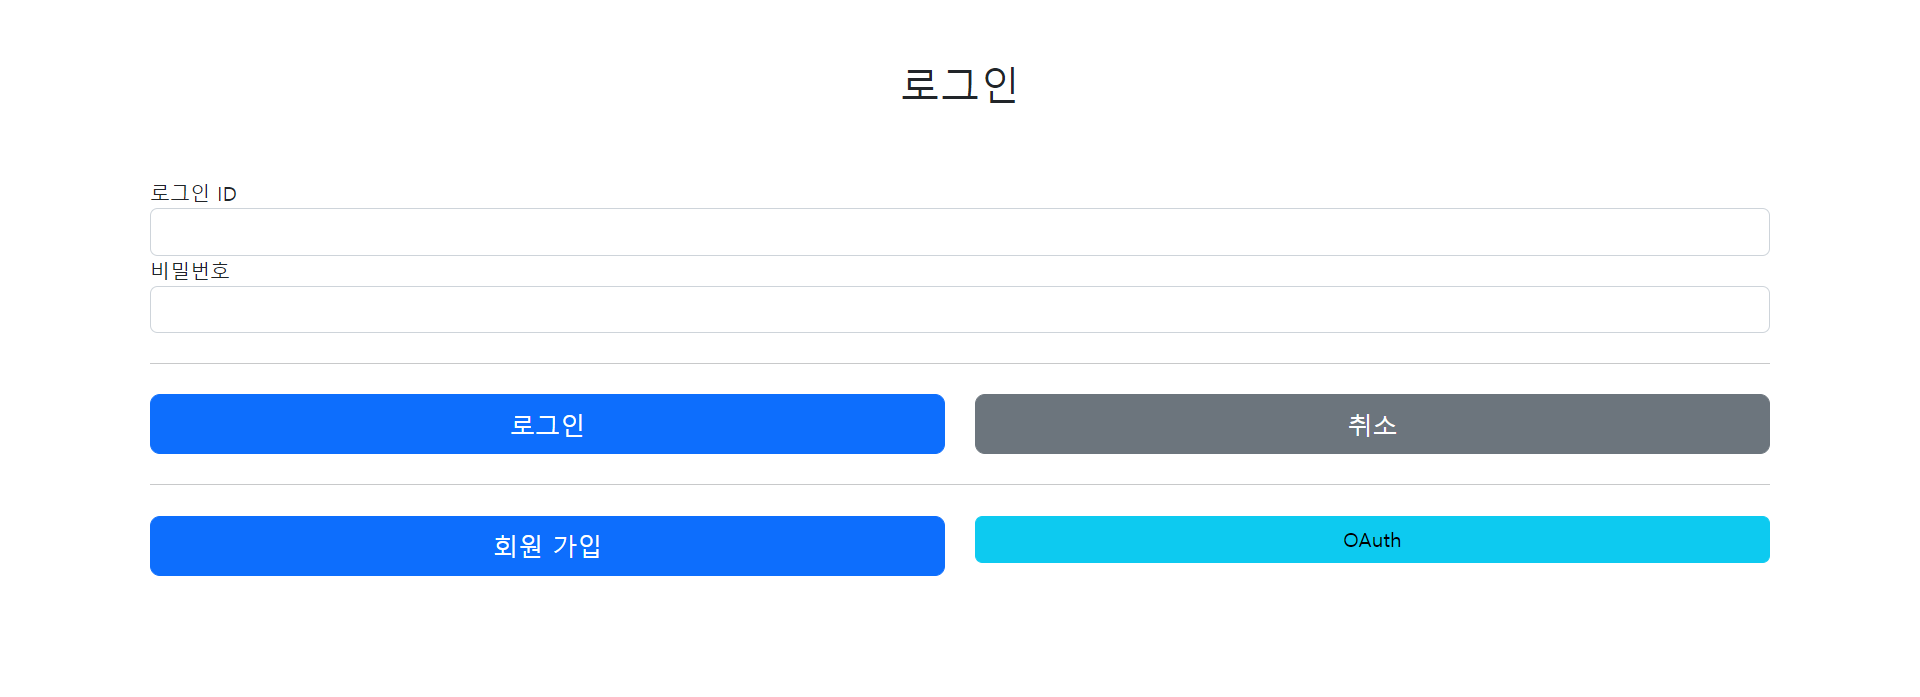
로그인 기본 페이지를 bootstrap에서 가져왔고 추가적으로 검색을 해보니 따로 컨트롤러를 만들어주지 않아도 default url 만 연결하면 된다고 한다.
기본적인 html 파일은 다음과 같이 구성하였다.
<!DOCTYPE html>
<html lang="en">
<head>
    <meta charset="UTF-8">
    <link rel="stylesheet" href="https://cdn.jsdelivr.net/npm/bootstrap@5.2.0/dist/css/bootstrap.min.css"
          integrity="sha384-gH2yIJqKdNHPEq0n4Mqa/HGKIhSkIHeL5AyhkYV8i59U5AR6csBvApHHNl/vI1Bx" crossorigin="anonymous">
    <title></title>
</head>
<body>
    <div class="container">
        <div class="py-5 text-center">
            <h2>로그인</h2>
        </div>
        <form action="@{/login_proc}"method="post">
            <div>
                <label for="loginId">로그인 ID</label>
                <input type="text" id="loginId" class="form-control"
                       >
            </div>
            <div>
                <label for="password">비밀번호</label>
                <input type="password" id="password"  class="form-control"
                       >
            </div>
            <hr class="my-4">
            <div class="row">
                <div class="col">
                    <button class="w-100 btn btn-primary btn-lg" type="submit">로그인</button>
                </div>
                <div class="col">
                    <button class="w-100 btn btn-secondary btn-lg"
                            type="button">취소</button>
                </div>
            </div>
        </form>
        <hr class="my-4">
        <div class="row">
            <div class="col">
                <button class="w-100 btn btn-primary btn-lg">회원 가입</button>
            </div>
            <div class="col">
                <button class="w-100 btn btn-primary btn-info" onclick="location.href='/oauth2/authorization/google'" >OAuth</button>
            </div>

        </div>
    </div>
</body>
</html>
이렇게 설정하고 컨트롤러에서 페이지를 연결 한 후, 재시작을 해봤다.

기본 관리자/판매자/소비자가 들어가 있는 상태다.
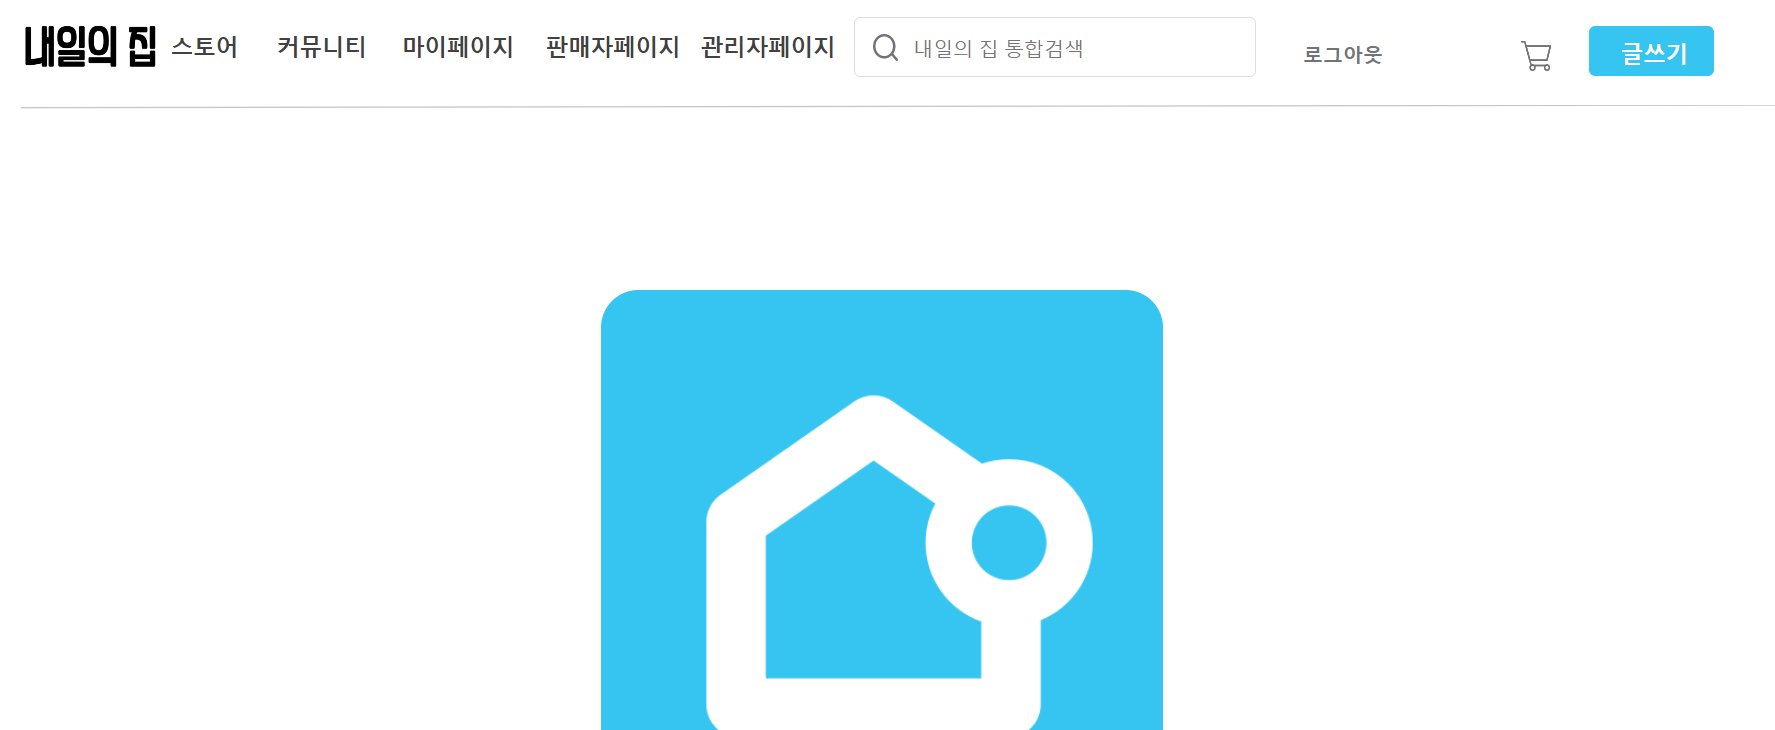
oauth 페이지로 일단 들어가본다.
OAuth를 클릭해서 소셜 로그인을 해본다. (후에 구글 카카오 네이버 넣을 예정, 현재는 구글만 테스트)
화면은 로그아웃이 활성화 되어 있고, 로그인 한 화면이다.
Member 데이터 베이스를 살펴보니 insert 되어 있었다.

추가가 된 것을 확인할 수 있었다.
'Web > Spring' 카테고리의 다른 글
| [Spring Security] OAuth2 + @AuthenticationPrincipal (0) | 2022.08.23 |
|---|---|
| [Spring Security] OAuth 기본 개념 정리 (0) | 2022.08.20 |
| [Spring] Spring Security - OAuth2 사용해보기 (1) (0) | 2022.07.29 |
| [Spring] Spring Security 기본 이해 - (5) (0) | 2022.07.13 |
| [Spring] Spring Security 기본 이해 - (4) (0) | 2022.07.10 |